The
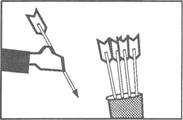
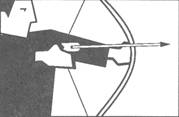
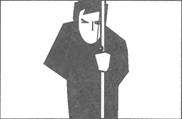
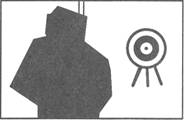
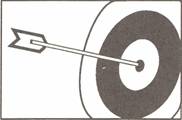
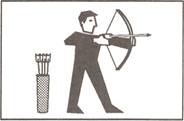
following (abridged) extracts are taken from: Scriptwriting A scriptwriter is not an essayist or journalist, not a novelist or textbook writer. A scriptwriter is a visualiser, a writer for film and video. Scriptwriting should be picturising' a flow of ideas, facts and perceptions. Always remember: A film is not a story read aloud. Though the words and soundtrack are, of course, important, the major impact of film and TV is almost always with the pictures. The following general guidelines are designed to suggest a procedure for writing simple scripts and to help avoid a few common pitfalls in writing commentaries. Before beginning, the following points need to be considered: Stage one What are the aims and objectives of the program? What points will you need to make to achieve these aims and objectives? Remember, it's difficult for an audience to absorb more than five main points in one program. The writer needs to decide on these points right at the beginning, because they will then largely determine the content. Define your audience. Are they farmers, students, housewives, prisoners, patients, children, social workers, teachers ... ? What is their age group? How much do they know about the subject? (It's safer to assume they know very little.) What size will your audience be a broadcast television audience or a small discussion group? Thorough research is essential before starting to write a script. A film or video program is, by necessity, a simplification of its subject. The writer's job is to present the subject in such a way that its true significance can be seen and understood. How much budget has been allocated for the program? (The answer is probably `minimal'.) The budget will determine: - The format what is to be shown, how it is to be shown. If the budget is limited, every means of saving money should be explored. For example, is it really necessary to take a crew to the hospital when you could achieve the same effect with a sequence of still photographs? - The number of different locations possible - The number of people who can be involved, both talent and crew - The amount of equipment allowable. It may mean no difficult or fancy shots because of the additional equipment required. Stage two Approximately how long should the program be? This will depend on the type of program, but as a general guide: - A trigger tape might be 2-4 minutes - A demonstration might be 5 minutes - A story might be 10 minutes - A documentary might be 20 minutes or more. - In general, twenty minutes is considered the best length for maximum learning, retention and concentration. What format should the program have? - Is it narrative, dramatic or documentary? - If it's a documentary, will any part of it be dramatised? - How much of it will be shot on location? Exterior or interior? How much will be done in a studio? - Will there be a graphic or photographic sequence? Animation? - Will there be a link person? - How many interviews should be allowed? - What kind of special effects, if any, are required? Stage three You're now ready to start visualising the ideas, step by step. You need to think about how the program should start, develop and finish. One of the best ways of doing this is to draw the ideas shot by shot to form a storyboard. You don't have to be an artist a rough scribble is sufficient to give the director an impression of your ideas. The storyboard should have a rough description of the shots and what happens in them. For example: Storyboard for `The Archer'
Write the necessary dialogue for drama sequences, or the commentary for `to-camera' segments by the link person. The overall script should be completed prior to shooting so the director has a greater understanding of the shots required and the length needed for each shot. Stage four Shoot according to the script outline or storyboard, using a shot list which gives details of the individual shots, eg, CU, LS. Be sure to keep records of what you've taped so you don't inadvertently forget some shots. Stage five Edit sequences if necessary Record commentary Record music, sound effects and do final mix Edit soundtrack to tape. The pitfalls If you're starting to write your own commentary and have had little previous experience, the following tips may be helpful. Do not overwrite The number one danger in writing is to write too many words. Allow `breathing space' let sound effects and/or music complement or reinforce your words. Beware the illustrated lecture If you haven't had much experience at scriptwriting, it's likely that you'll start a script by writing what you want to say, as you would a lecture, then trying to illustrate it. This can be terribly frustrating, and you can waste lots of time this way. Start by thinking visually. Limit what you want to say to from two to five main points, then think how you can most effectively visualise these points. It's preferable to re-write the narration after the program has been shot and edited. Dialogue and `to-camera' commentary are, of course, the exception. These should be written prior to shooting. Avoid `literary' forms of writing A film or television commentary is not a literary form of writing. Avoid literary figures of speech, long words and dependent clauses. Use short sentences but allow variation in rhythm, tempo and mood. Make the ideas simple and easy to grasp; use simple words and use words simply; use as few words as possible. In many instances you will find that you can cut up to 25% out of your commentary once you've written it. Use a conversational style of writing. After all, you're trying to speak to the audience. Talk `to' rather than `at' them and don't patronise them. Remember: The audience should be able to hear and absorb the commentary without strain or confusion. Don't describe the picture Don't state what's obvious, except where the audience's attention needs to be drawn to a certain aspect of the picture (eg, `The dog lying on the front step of the pub has been there since 1902!'), or in an educational program when an experiment, demonstration or unfamiliar activity may need to be described in order to be understood. Remember that the function of commentary is to: Explain what the picture means, ie, its significance Summarise the main points and make conclusions Complement the picture. Picture and sound should not compete with or duplicate each other Interest and entertain the audience it's a very effective way to educate and inform them. TV script format Not all programs have a written script, and not all scripts are alike. But whatever the script, it must be easy to read. Most production centres adopt a standard style so that personnel, such as vision mixers, don't have to constantly adjust to each new script placed in front of them. Basically, the vision is on the left-hand side of the page and the audio is on the right. Lighting is sometimes placed in boxes in the centre of the page, and sometimes on the extreme right of the page. A news script may not be completed until a few moments before on-air time (and sometimes not even then!), whereas a drama script has to be completed well in advance of production. For a drama script, each camera shot is numbered, and a scene breakdown, schedule, cast list and crew list are often attached. There's often a number of different coloured papers used to help identify an episode or a call sheet from a script. Schedules These are best typed out in a format suited to each particular production. They must contain all required information and be easy to read. The shooting schedule should include date of shoot, times, places, title, production number, order of recording, characters involved in each scene, set involved, cameras used in each scene, shots within each scene, page number of the script, and all breaks. Call sheets should list date, time, place, names, and contact phone number so that cast or crew can report in should anything go wrong to delay their arrival. A breakdown should include scene number, synopsis of the scene, its location and time of shooting, whether film or video (if an integrated production), estimated duration of the scene, page number in script. Scripting terms Outline A brief explanation of what the program will be about. It rarely extends to more than one page. Treatment This is more specific and detailed than an outline, but does not usually have dialogue or screen directions. It will show the structure and flow of the program, name the main characters, and demonstrate the sequences and how they fit together to develop the storyline. For a documentary, the treatment will present the main points that the narration will discuss, outline the sequences to be shot, and give details of possible interviews, etc. It's quite usual in a documentary to not proceed past the treatment stage before shooting. Script This is a very general term. We speak of a script even when there's no dialogue or narration and where, for instance, the program could be comprised of only music and pictures. Draft screenplay An incomplete script. It will follow and develop the original treatment and provide most of the proposed dialogue and directions for actors. Rehearsal script A draft screenplay taken to the point where the director feels that it's capable of being shot, perhaps with minor modifications. Shooting script A rehearsal script, slightly more refined. This is a term used more in film production than in television. Camera script The final script with all camera directions and shots marked and numbered. Graphics and captions are listed in order and special instructions to any particular Script development The following examples illustrate the development of the script through its various stages:
The need exists for a plan to help people get more use out of their roof space ...
We open with Fred and Mary struggling to fit yet another large pot plant into their small terrace. Mary walks to the window and looks out.
INTERIOR. UPSTAIRS ROOM._______ DAY FRED and MARY struggle with large potplant. FRED drops his end and almost crushes MARY's foot. MARY yelps, looks angrily at FRED who tries to move the small bookcase to another spot. MARY realises she won't get an apology out of FRED, and resignedly walks to the window. We see MARY's P.O.V. over the flat roof.
INTERIOR. UPSTAIRS ROOM._______ DAY 1. WS ROOM. Through the door ZOOM IN TO TWO FRED and MARY enter heaving SHOT the large potplant. MCU FRED FRED is puffing and blowing MCU MARY WIDENS MARY: TO INCLUDE FRED I still think we should have moved the bookcase first. FRED: It'll be alright. Just put it down here.
Variations in the size of the images which appear on the screen enable the director to emphasise or highlight different aspects of the shot. There's a standard terminology referring to shot sizes. These terms provide points of reference when describing shots. Include these abbreviations in your storyboard and script. Very long shot (VLS) Shows the entire scene. The human figure occupies approximately half the height of the screen. Long shot (LS) The human figure occupies a little under the full height of the screen. Medium long shot (MLS) Screen image of the human figure is cut off approximately at the knees. Medium shot (MS) Screen image of the human figure is cut off just below the waist. Medium close-up (MCU) Cuts across breast line and includes head and shoulders. Close-up (CU) Only the head and shoulders of the human figure can be seen Big close-up (BCU) Picture of the head, or part of the head only. Extreme close-up (ECU) Enlarges detail to larger than life size.
Single camera: Interviewee as the main shot, reverse angle questions to be cut in later The main interview is conducted with the camera on the interviewee (the subject) all the time. Shot sizes can be varied gradually (during responses) or rapidly (during the interviewer's questions) to provide variety for the final edited version. After the interview is complete, the camera is directed at the interviewer and he or she asks the questions again. It's important to have the list of questions available, so the interviewer can refer back to what was asked during the real interview. `Noddies', mute shots of the interviewer or interviewee looking interested but not saying anything, can also be useful in editing. But remember the eyeline and make sure the shots will cut together with some semblence of compatibility in backgrounds. The major advantages of this style of shooting are: A tight presentation, with the appearance of having two or more cameras on the scene. Edit points pass unnoticed. The interviewer is clearly identified The cameraperson has an easier job since not a lot of movement or change of shot is called for during each take. Single camera: Moving style (camera verité) In this style of production, there are no reverses of the interviewer, and only movement of the camera or changes of shot size allow for edit points. If there's no shot variation or movement, jump cuts will be very obvious when the piece is edited. Advantages of this style: The person being interviewed is the sole focus of attention, although the opening shot could pan off the interviewee to establish the interviewer's presence The cameracan sometimes move around the scene to objects being described and thereby pick up details that may serve as cutaways that help in editing An over-the-shoulder shot from behind the interviewer or the interviewee may also be useful in editing, but be careful to maintain continuity, ie, if the interviewee is looking from right to left in the close-up, then he/she should be looking the same way in the wide shot.
Some general hints for interviewing Make sure your questions are organised. Have a good background knowledge about the interviewee and that person's relation to the topic of discussion. Aim for clear and precise answers, but avoid `closed' questions which can simply be answered by `yes' or `no'. Aim to draw information from the interviewee. You're not in competition and don't have to prove that you know more than the interviewee. Don't talk the subject out before the camera rolls. Certainly give some idea of the outline and form of the interview, but don't rehearse the actual questions and answers if you can avoid it. When the camera is finally running, try an easy or irrelevant question first just to get your subject talking. You don't have to use the answer in the final edit, but it will serve to ease the tension. Although the questions may have been written down, don't read them out when you come to do the interview. Ask the questions naturally and always listen to the answers. If something really interesting is said, follow it up spontaneously, don't feel obliged to go on to the next question. Maintain eye contact. The subjects are usually more nervous than you. If you keep looking away, the feeling of nervousness is likely to increase. If you look at them directly and nod in affirmation from time to time, they will gain confidence. Avoid punctuating their answers with `I see' or `Uh huh' and other verbal signals of interest which can become irritating to the viewer. Leave space at the end of each answer for the editor to find edit points if necessary. Don't go on forever in the hope of getting the answer you want. Interviewees tend to burn out after a certain time, and even if you haven't got all you hoped for, points can be picked up in the commentary, or obtained from another interview with someone else. Don't be afraid to stop if things aren't going well. Occasionally look at the cameraperson or VTR operator, who may be signalling some kind of fault. If you're dealing with a hostile interviewee, it often pays to pause for a while and allow time for everyone to blow off steam. Don't allow the technical processes to dominate the interview. Set up as quickly as possible, don't shout or argue with the crew. If a hand mike is used, keep it in the hand furthest from the camera. |