The
following (abridged) extracts are taken from:
Guide to Video Production
- Australian Film, Television & Radio School - ISBN 0 04 442165 6
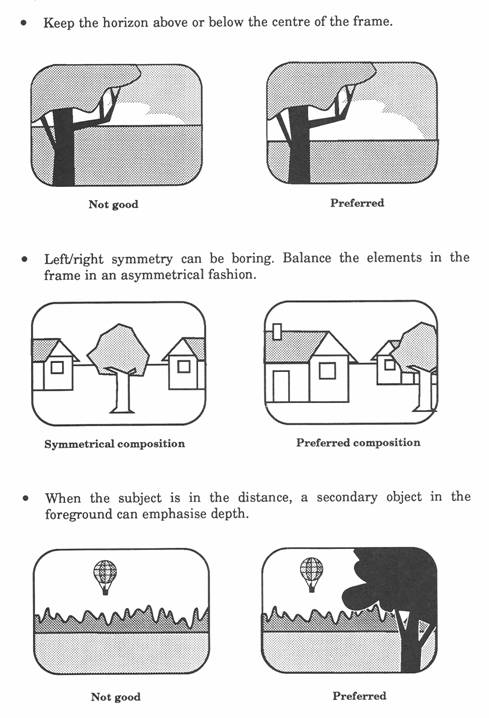
Framing and Composition
Film grammar
Every form of communication has a basic grammar and a set of ground rules that have evolved through experience.
In television, as with filming, certain practices and techniques have been devised to ensure that the wide gap between the communicator and audience is minimised. This means that there are safe formulas for making television pictures effectively, though any experienced director will know that it's occasionally necessary and beneficial to depart from these practices to produce a different kind of effect or statement. There's no absolute right and wrong, only degrees of effectiveness and failure.
The following notes are designed to give you the basic rules of grammar from which you can make your own sentences, and form your own poetry if you wish. But remember, you have a responsibility to make your particular form of communication as effective as possible. By sticking to the rules you will at least have a chance of arriving at your destination, whatever it may be. By departing from them without a good reason, you could be heading for disaster.
Balance
One of your first tasks is to balance the images on the screen. Balance depends on a number of factors, such as the size of the subject, the subject's position within the frame and the relationship of the subjects to each other. Shots where the subject is always positioned in the centre of the frame tend to be dull and don't hold viewer interest for long. Angled shots often give more drama and dimension than full frontals.
Framing
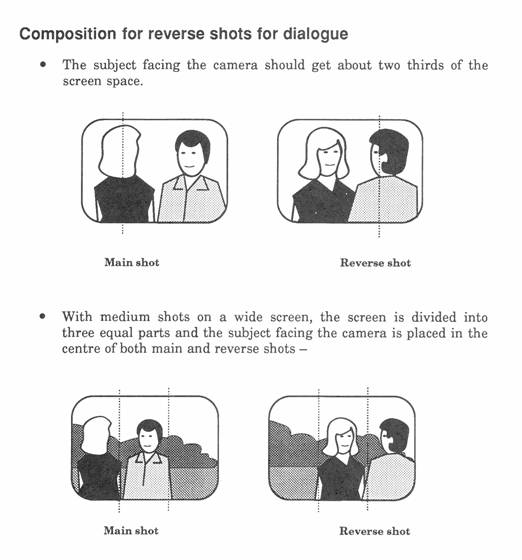
The eyes play an important role in communication. Taping conversations with the subject's eyes averted or the head turned away can risk a breakdown of communication to the viewer. The mouth, too, is an important element in face-to-face communication and usually should not be shot in such a way that you only see the lips moving in profile.
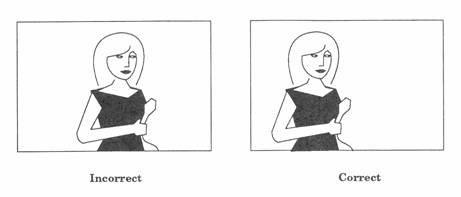
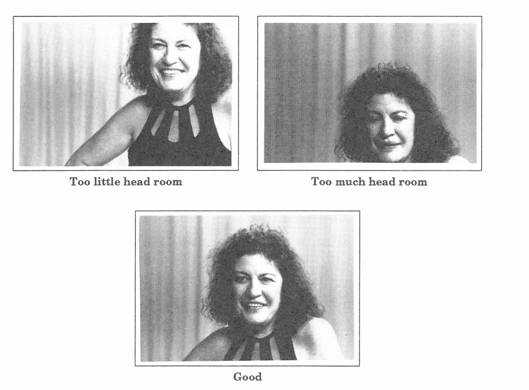
In framing people on camera, you should generally aim to put their eye level roughly two thirds of the way up the screen. In medium shots you should always leave a little headroom, that is, the space between the top of the head and the top of the TV screen.
Incidentally, when shooting in semi-profile, that is to say with the head turned slightly away from the direct line of the camera, always leave `talking space', or nose room, in front of the speaker. Similarly, if the subject is moving across the screen, always leave a little space in front into which the subject can move without appearing to bump into the edge of the frame.
The following page shows the standard shot sizes used in television. As you can see, they're defined in relation to the human figure.
A fluent understanding of these shot sizes is useful in both planning your coverage and in shooting it. You don't have to stick to these shots exactly you can plan a `loose mid shot' or a `tight long shot' but these defined shots give you an industry-accepted framework from which to work.
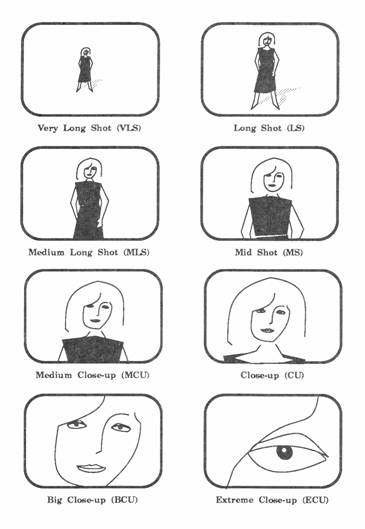
Standard terminology of shot sizes
Note:
With the exception of the term `close-up', all terms apply only to the shot size of a human figure. For example, you can't have a mid-shot of a car.
There's no suggestion here that these are necessarily always the desired framings. They're just standard points of reference.
`Very long shot' is often a vague term meaning any shot of a figure `wider' than a long-shot.
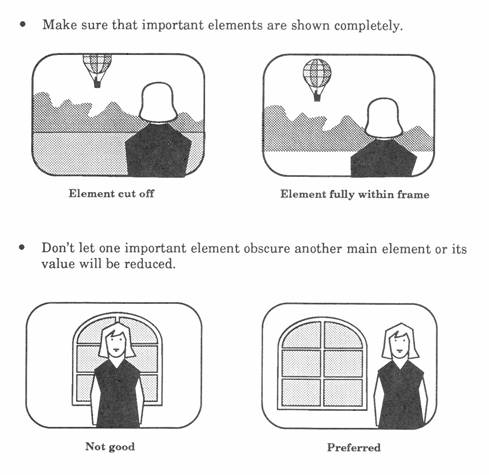
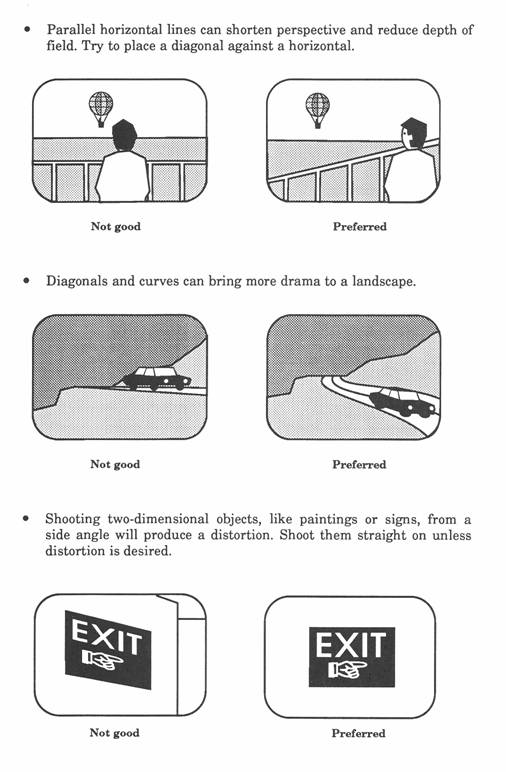
Composition
The art of composition is in arranging the elements of a scene so the totality of the picture yields the desired effect.
In most cases the aim is for a balanced and visually pleasing image, but sometimes a disharmonious composition is used to reinforce the tension or drama of the storyline.
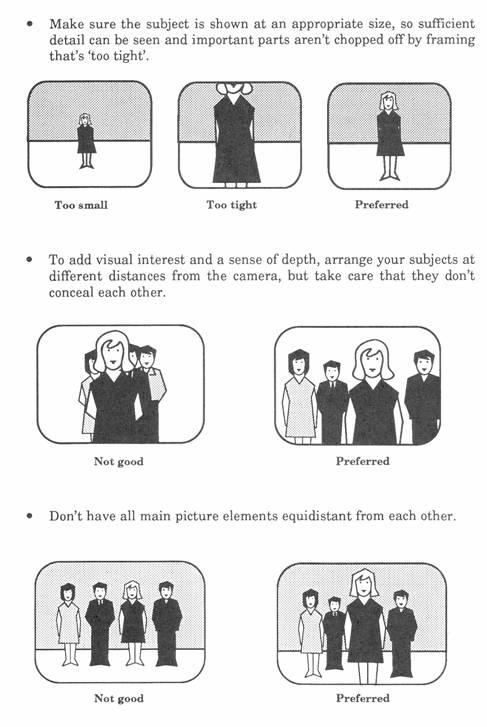
Some basic guidelines are:
Camera Techniques
Handling the camera
You'll generally have the choice of mounting the camera on a tripod, or handholding it, preferably on your shoulder, in order to follow some action more closely. Be warned that handholding is a difficult skill to acquire and, if not done properly, can lead to very shaky and unsatisfactory pictures. This jerkiness can be reduced if you use wide angle, and ensure that the camera rests firmly on your shoulder. It's best to avoid the telephoto position whenever possible when handholding because it accentuates any shakiness.
When walking with the camera, move slowly, with legs slightly bent, and try to keep the camera parallel to the ground. A camera extension cable will give you greater freedom of movement if you're working on your own.
The tripod
When setting up a tripod, it's essential to set it level. Better quality tripods are supplied with a bubble level gauge and ball-and-cavity levelling system so you don't have to waste time getting the legs exactly equal. For tripods that don't have a level gauge, line up vertical lines of buildings, etc, with the edge of your viewfinder screen.
The tripod should be used whenever possible. It's essential for stills, graphics and shots where there's very little subject movement.
Panning
Panning refers to rotating the camera in the horizontal plane; that is, turning it to the left or right. It's usually done on a tripod. Panning is used to show the spatial relationship between two subjects, or to follow the action, or even to survey a particular scene. The following points should be observed when panning:
Make sure that the horizon line is level at the start and end of each pan.
Roll the tape before starting the pan, and continue to record the scene after the pan stops. This will facilitate editing later.
The speed of the pan should be slow enough so that the audience can absorb the information and fast enough to prevent the audience becoming bored.
Whether handholding or using a tripod, always go from an uncomfortable to a comfortable position. This means you should first physically face the end of the shot and then turn the camera and your body to the starting position, with your feet facing the end shot. This means the pan gets easier for you as you move through it and helps avoid an awkward camera jerk just near the end of the pan.
A fluid head tripod is recommended for smooth pans.
Tilting
Tilting refers to vertical tipping of the camera. It's similar to panning for showing spatial relationships between subjects. It can also emphasise height or depth or follow action up or down.
Dollying and tracking
A `dolly' is a unit with wheels to which a tripod can be attached.
Dollying refers to movement of the camera towards or away from the subject.
Tracking is movement of the camera to the left or right. The camera can also be `tracked' ahead of or alongside moving subjects to maintain perspective.
Zooming
`Zooming in' increases the focal length of the lens and the size of the image on the screen. Zooming out decreases the focal length of the lens and the size of the image. It is usually easier to zoom than to dolly.
The zoom lens is very useful and convenient for choosing different focal lengths for static shots, but don't overdo it. Zooming in and zooming out on a subject may fascinate the camera operator, but can quickly irritate viewers and make editing between shots quite difficult.
Objective angle
An objective camera shoots the action impersonally, as if through the eyes of an unseen, outside observer. Objective camera angles are therefore excellent for giving an overall view of what's happening.
Subjective angle
Subjective shooting brings the viewer into the scene. The camera lens becomes the eye of a person within the action. The viewer is then personally involved, not just watching the action from the sidelines. Subjective camera angles are good for demonstrating how to do something.
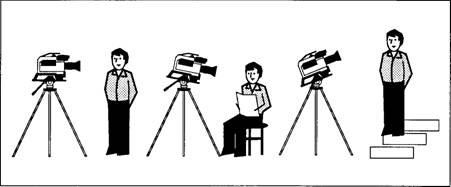
Camera height
Camera height refers to the angle at which the camera looks at the subject. There are three basic positions:
 |
Eye level High
angle Low
angle |
Eye level shot
The camera is horizontal to the ground. In wide and medium objective shots the camera should be at the height of the unseen observer. Close-ups should be made at the height of the subject.
High angle shot
The camera is tilted downward at the subject. High angle long shots help orient the viewer because they show the relationship between the various elements of the setting and are also useful if the action occurs in great depth.
High angle shots of persons can make the subject look unimportant and inferior, giving the viewer a sense of superiority.
Low angle shot
The camera is tilted upward at the subject. Low angles tend to dramatise the subject, giving it an aura of authority or grandeur.
Low shots are also useful for separating the subject from the background, for eliminating unwanted foreground and background, and for heightening the illusion of size, speed and perspective.
Camera movement
One of the problems frequently encountered with people learning how to use video cameras is the urge to keep the camera moving. Zooming, panning and tilting all seem irresistible to the newcomer, but they pose a number of problems, not only to the viewer, but also to the editor.
Remember, it's very possible to produce strong feelings of movement with a static camera. Don't move unless it improves the shot.
Shooting rules
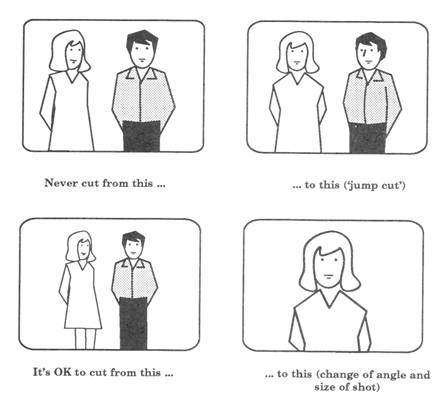
Don't shoot jump cuts
Jump cuts occur if two very similarly composed shots of the same subject are cut together. The effect is distracting and can even be ridiculous. Solutions:
Make a major difference in the size of adjacent shots involving the same subject, eg, long shot to medium shot, or medium shot to close-up. This can be done by (a) moving the camera nearer/further away from subject, (b) moving the subject, (c) zooming in or out.
Change the camera angle between shots, eg, full face to half profile, or eye level to a lower angle shot.
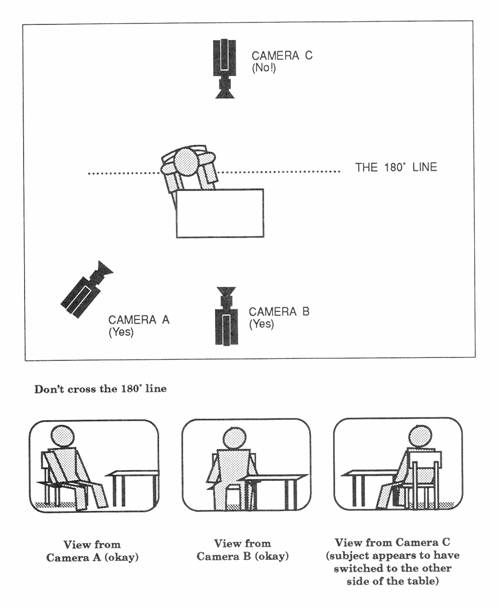
Don't cross the 180° line
In each scene you shoot, there's an imaginary line which, if crossed, will cause an object or person to jump to opposite sides of the frame in consecutive shots.
Draw the imaginary line on your storyboard picture before shooting a scene. This will show you the limits of your camera positions.
Always make sure that, if the subject appears on the left hand side in one shot, it also appears on the left hand side in the next.
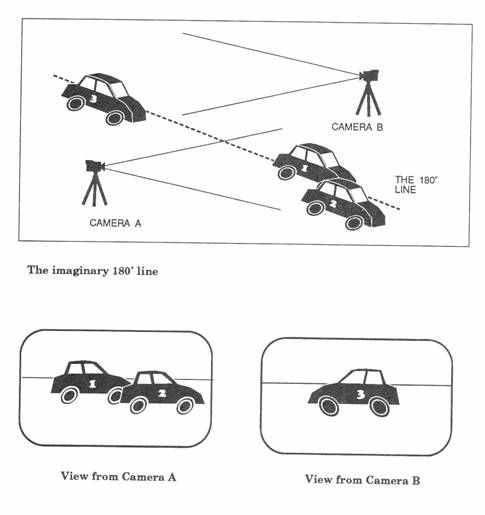
Crossing the imaginary 180° line will also make the action appear to reverse direction. Be sure that people or objects only change direction if seen to do so in shot.
During a car race, for example, continuity of action is essential. It tells the viewer where s/he is. Break that illusion and a person becomes disoriented and distracted and the whole situation becomes ludicrous.
Don't pan, tilt, zoom or track your camera unless you have a reason to do so.
Avoid restless camera movement. The eye should always anticipate a camera movement, because the audience wants to have subconscious questions answered. For example:
What is that object in the distance? What is that child playing with? (Motivation to zoom in so the eye can see the object more clearly.)
Where is that person going? What's at the other end of that building? (Motivation to pan left/right.)
How tall is that building? Who do these feet belong to? (Motivation to tilt up.)
Remember:
Panning should be done very slowly because (a) the eye needs time to take in the information in the picture, and (b) a strobing or bending effect of vertical objects occurs if a pan is done too fast.
The audience can become `seasick' by frequent zooming in and out.
Don't leave the audience wondering why the camera is panning, tilting or zooming. The motivation must be clear.
Allow enough space when framing people
If a person is not framed properly, s/he will appear to sink through the frame, or to be hanging by the neck! Keep the subject's eyes about two thirds up the height of the frame.
Allow your subjects speaking/breathing space. For example, if they're talking to someone out of shot, to the right of frame, place them left of centre in the shot.